
Introduction
Monitoring your blood sugar at home isn’t just for people with diabetes—it’s a smart move for anyone who wants to understand their health better. Blood sugar, or glucose, is the main source of energy for your body’s cells. Your body gets glucose from the food you eat, especially carbohydrates like bread, rice, and fruit.
When blood sugar is at a healthy level, your cells work well and your body has steady energy. But when it’s too high or too low, you may feel tired, dizzy, shaky, or unwell. Over time, abnormal blood sugar levels can increase the risk of serious health problems, such as heart disease, nerve damage, and vision loss.
By learning how to check and track your blood sugar, you give yourself valuable insight into how your body responds to food, exercise, stress, and even sleep patterns. For example, you might notice your levels spike after a sugary snack or drop after intense exercise. These patterns help you make better choices for your health and lifestyle.
This guide will walk you through the tools, steps, and tips you need to test at home like a pro—so you can take control of your health before problems start.
Why Monitoring Blood Sugar at Home Matters
When you check your blood sugar regularly, you can:
- Spot early signs of problems before symptoms become severe. This means you can catch high or low blood sugar early, even before you feel sick. Early action can prevent bigger health issues in the future.
- Adjust your habits to keep blood sugar steady. You can fine-tune your diet, exercise, and daily routine based on what works best for your body. Small changes can lead to big improvements over time.
- Work with your doctor to create a plan that fits your lifestyle. Sharing your home test results with your healthcare provider helps them give you better, more personalized advice.
For example, you might find that your blood sugar spikes after certain foods like white bread, sugary snacks, or soda. On the other hand, you might notice that simple actions—like walking for 15 minutes after dinner or choosing whole grains instead of refined carbs—help bring your numbers down.
Over time, you’ll see clear patterns, such as how stress, sleep, and even hydration affect your readings. These insights give you the power to make informed choices every day, so you can keep your blood sugar in a healthy range and feel your best.
Tools You’ll Need
Monitoring at home is simple if you have the right tools.
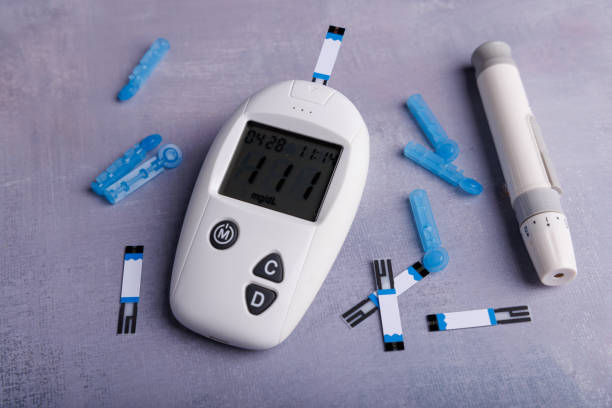
Glucometer
A glucometer is a small handheld device that measures your blood sugar level using just a drop of blood, usually from your fingertip. It works by reading the amount of glucose in your blood and showing the result on a screen. Using a glucometer at home is quick, simple, and can give you accurate information in seconds.
When choosing one, consider:
- How quickly it gives results – Some models can show your blood sugar reading in as little as 5 seconds, which is helpful if you test often or need to make fast decisions about food or medication.
- If the display is large and easy to read – A clear, bright display makes it easier to check your numbers, especially for people with vision problems.
- Whether it stores your past readings for tracking – Many glucometers can save weeks or even months of results, so you can spot patterns over time or share the data with your doctor for better care.
Some advanced glucometers also connect to smartphone apps through Bluetooth, allowing you to log readings automatically and track trends without manual recording. Choosing the right glucometer ensures that checking your blood sugar becomes a smooth and stress-free part of your daily routine.
Example: If you have poor eyesight, a meter with a backlit screen and voice prompts can make testing easier.
Test Strips & Lancets
- Test strips are small, disposable strips that go into the meter. They’re coated with chemicals that react with your blood to measure glucose.
- Lancets are tiny needles used to prick your finger for a blood drop.
Tip: Always store strips in their container with the lid closed—humidity can damage them and give inaccurate results.
Logbook or App
Recording your results is key.
- A paper log is simple and works anywhere.
- Apps can graph your readings and let you share data with your doctor instantly.
Logging helps you see patterns that aren’t obvious from a single reading.
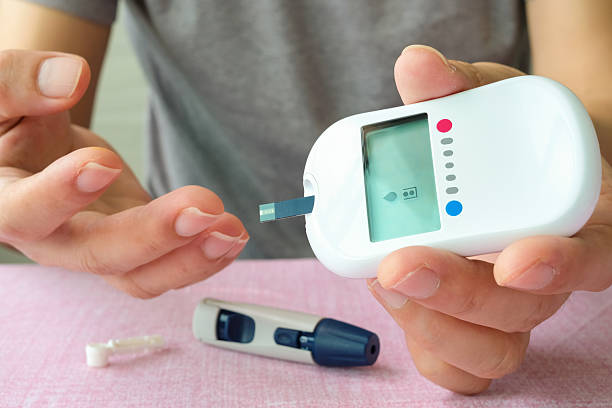
Step-by-Step: How to Check Your Blood Sugar
Here’s how to get an accurate result every time.
1. Wash Your Hands and Prep
Why it matters: Sugar from food, drinks, or even lotions on your hands can affect your blood sugar reading by making it appear higher than it really is. Even a small amount left on your skin can mix with the drop of blood and give a false result. That’s why washing your hands before testing is so important—it removes any leftover sugar, dirt, or residue that could change the numbers.
Warm water is also helpful because it increases blood flow to your fingertips. Better circulation makes it easier to get a good drop of blood without squeezing too hard, which can dilute the sample with other fluids and affect accuracy. Clean, warm hands mean you get a more reliable reading and a smoother testing process every time.
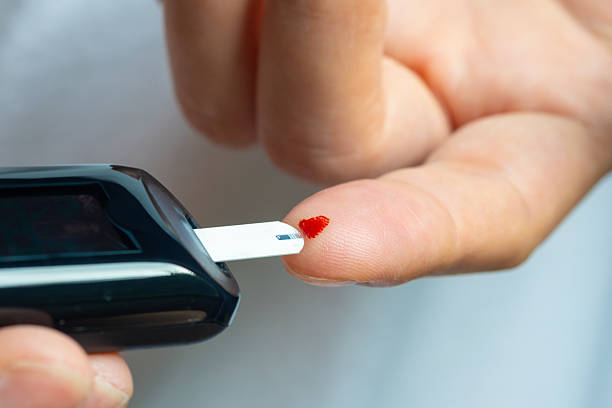
2. Get a Drop of Blood
Prick the side of your fingertip, not the center—it’s less painful because there are fewer nerve endings along the sides. The center of your fingertip is more sensitive and can stay sore longer if used often. By using the side, you can still get enough blood for testing while keeping discomfort to a minimum.
Alternate fingers each time you test so one spot doesn’t get overused and tender. Rotating between fingers also helps prevent calluses or thickened skin, which can make it harder to get a drop of blood in the future. Some people even switch between both hands to give each finger more recovery time. This small habit keeps testing more comfortable and sustainable in the long run.
3. Apply Blood to the Strip
Let the strip “sip” the drop of blood—don’t smear it. Most test strips are designed to draw in the right amount of blood automatically through a small channel. Simply touch the edge of the strip to the drop and let it absorb on its own. Smearing can spread the blood unevenly, which may lead to inaccurate results.
Too much or too little blood can cause an error or force you to repeat the test. If there’s not enough, the glucometer might not read it at all. If there’s too much, it can overflow the strip and give a false number. By letting the strip naturally pull in the sample, you help ensure a clean reading every time.
4. Read and Record
Meters usually give results in mg/dL (milligrams per deciliter) in the US or mmol/L (millimoles per liter) in many other countries. These units measure the amount of glucose in your blood. Knowing which unit your meter uses is important so you can compare your numbers with standard target ranges and any advice from your doctor.
Write down the reading, the exact time, and any notes like “after lunch,” “before breakfast,” or “post-exercise.” This extra context helps you see how meals, activity, stress, or even sleep affect your blood sugar levels. Over time, these records can reveal patterns—such as certain foods causing spikes or exercise helping lower numbers.
Keeping a detailed log makes your data more useful for you and your healthcare provider. When you share these records, your doctor can spot trends more easily and adjust your treatment plan or lifestyle recommendations for better results.
5. Clean Up
Use a proper sharps container for lancets. These containers are made of puncture-resistant material and are designed to safely hold used needles, lancets, and other sharp objects. They help prevent accidental pricks, keep your home safe, and protect sanitation workers when your trash is handled.
If you don’t have a sharps container, a thick plastic bottle—like an empty laundry detergent bottle—with a secure, screw-on lid can work temporarily. Make sure the container is sturdy enough so the lancets can’t poke through. Clearly label it as “sharps” and keep it out of reach of children and pets. When it’s full, follow your local guidelines for proper disposal to keep your community safe and reduce the risk of injury.
Tips for Accurate Results
- Avoid testing after washing with alcohol-based hand sanitizer—residue can affect readings.
- Don’t test right after eating unless you’re specifically checking post-meal numbers.
- If your readings seem unusual, wash your hands and test again.
- Keep your meter and strips at room temperature—extreme heat or cold can cause errors.
When and How Often to Test
Your doctor’s advice should guide you, but here are common times to check:
- Fasting: First thing in the morning before eating.
- Before meals: To see your baseline level.
- Two hours after meals: To see how food affects you.
- Before bed: To ensure you’re in a safe range overnight.
Example: Someone with type 2 diabetes might check before breakfast and after dinner, while someone on insulin may need more frequent checks.
What Your Readings Mean
Typical target ranges for many adults with diabetes (per American Diabetes Association):
- Fasting: 80–130 mg/dL
- Two hours after eating: Less than 180 mg/dL
If your numbers are consistently outside your target range, share your log with your doctor. Small changes to your diet, activity, or medication can make a big difference.
How to Use Your Log to Make Better Choices
A detailed log lets you:
- Identify which foods cause spikes or crashes.
- See the effect of exercise—like a walk lowering your numbers.
- Track how stress or illness changes your levels.
Pro tip: Add a column for “mood/energy” so you can link your physical feelings to your glucose levels.
Conclusion
Monitoring your blood sugar at home is more than a daily task—it’s a way to understand your body’s story. With the right tools, simple habits, and a bit of curiosity, you can make choices that help you feel stronger and healthier every day.
Now I want to hear from you: What’s your go-to testing time? Morning, before meals, or after exercise? Share below and let’s build a helpful resource together.